Tomcat - Request请求处理过程:Connector
本文主要介绍request请求的处理过程。
引入
线程池Executor是在哪里启动的?
Request是如何处理并交个Container处理的?
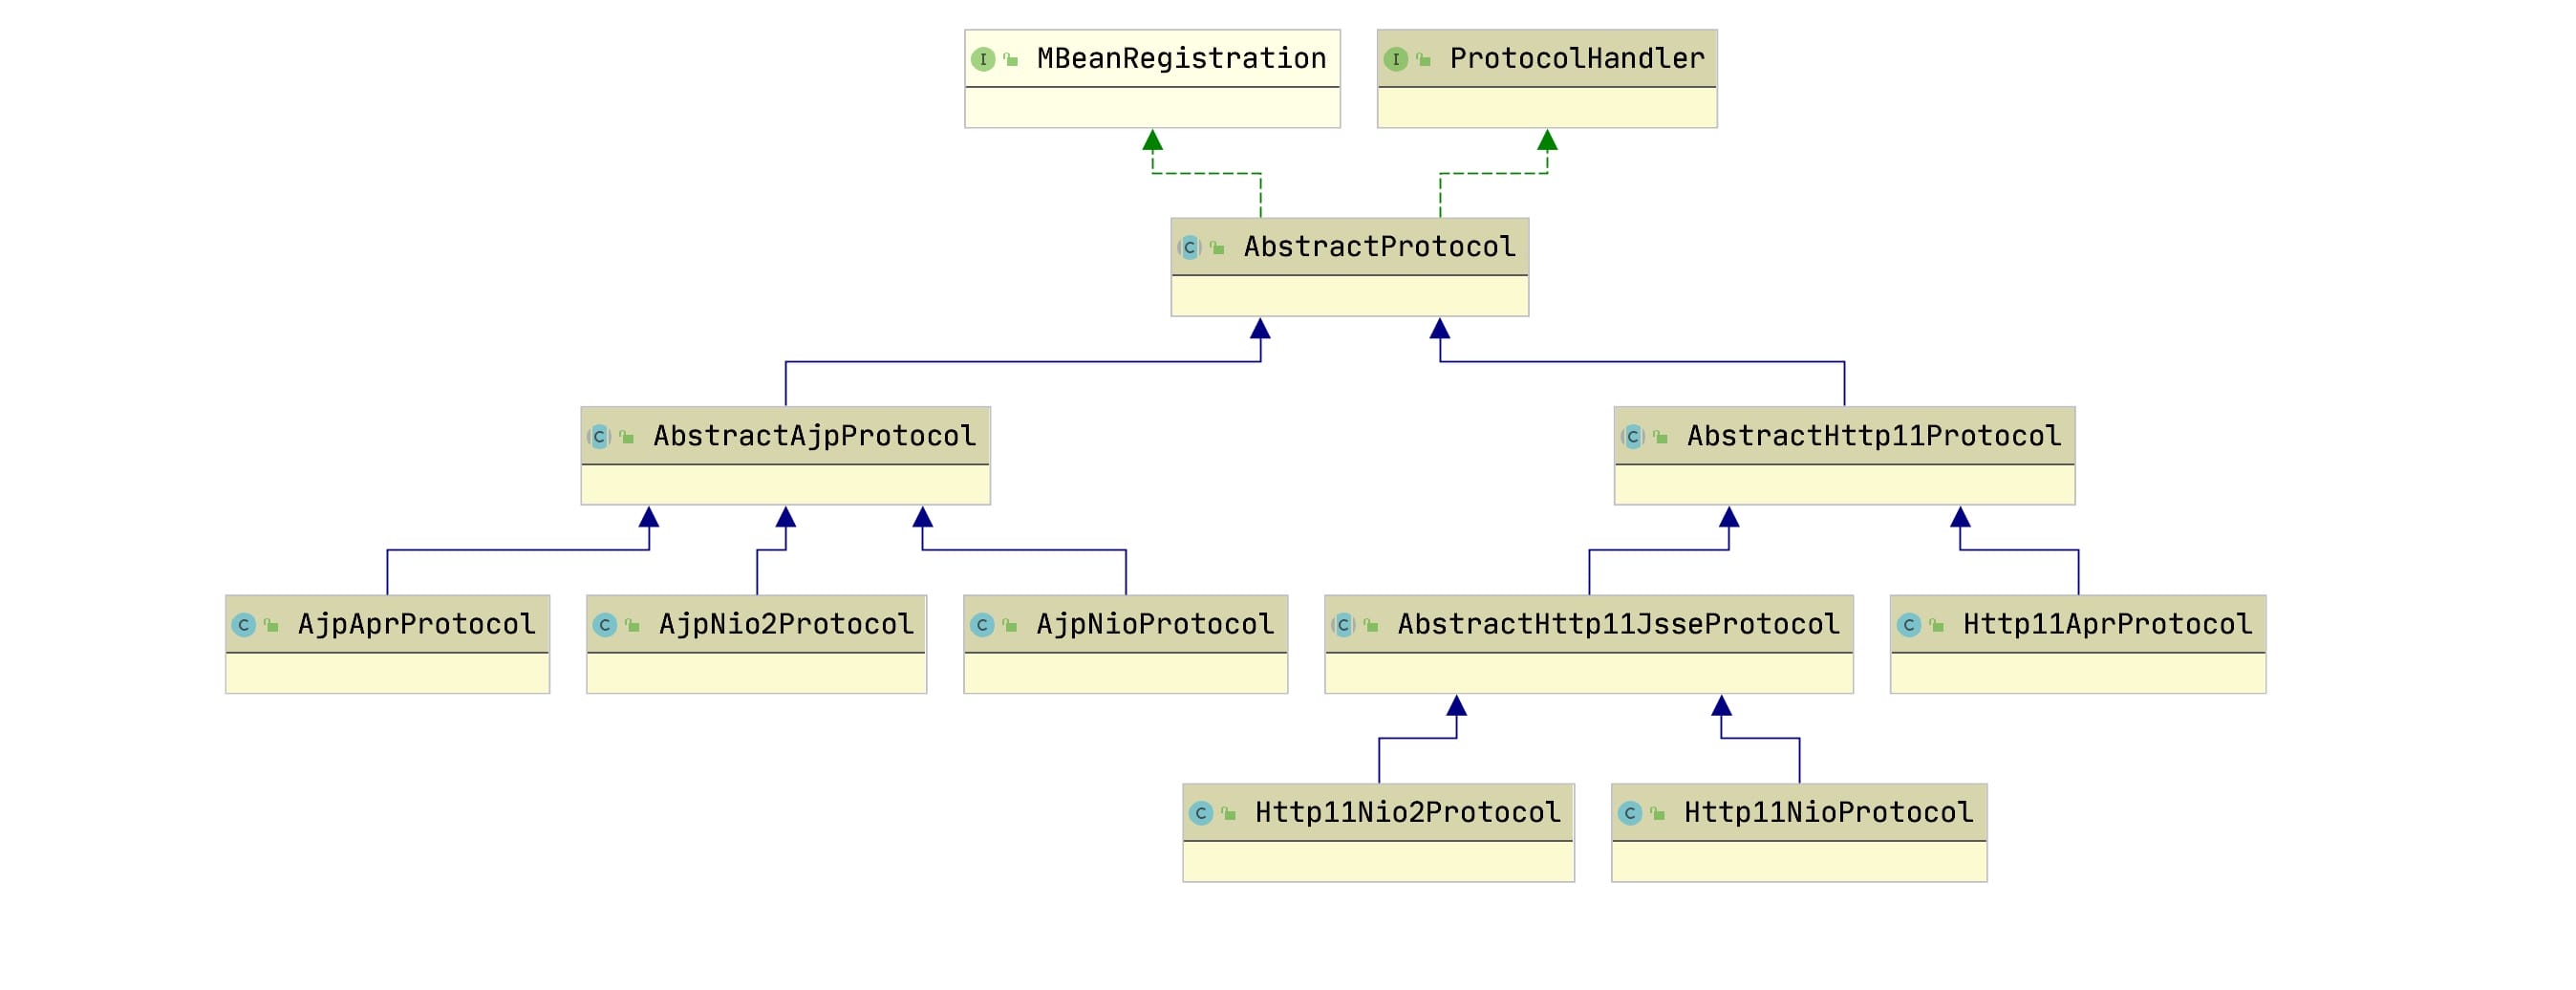
Tomcat支持哪些协议?这些协议是处理的?协议层次结构如何设计的?
Connector
Connector构造
本质是初始化了ProtocolHandler,默认是HTTP/1.1 NIO实现。
/**
  * Defaults to using HTTP/1.1 NIO implementation.
  */
public Connector() {
    this("HTTP/1.1");
}

public Connector(String protocol) {
    boolean apr = AprStatus.isAprAvailable() &&
        AprStatus.getUseAprConnector();
    ProtocolHandler p = null;
    try {
        p = ProtocolHandler.create(protocol, apr);
    } catch (Exception e) {
        log.error(sm.getString(
                "coyoteConnector.protocolHandlerInstantiationFailed"), e);
    }
    if (p != null) {
        protocolHandler = p;
        protocolHandlerClassName = protocolHandler.getClass().getName();
    } else {
        protocolHandler = null;
        protocolHandlerClassName = protocol;
    }
    // Default for Connector depends on this system property
    setThrowOnFailure(Boolean.getBoolean("org.apache.catalina.startup.EXIT_ON_INIT_FAILURE"));
}
ProtocolHandler是怎么通过protocol初始化实现的呢?我们看下ProtocolHandler.create(protocol, apr)
public static ProtocolHandler create(String protocol, boolean apr)
        throws ClassNotFoundException, InstantiationException, IllegalAccessException,
        IllegalArgumentException, InvocationTargetException, NoSuchMethodException, SecurityException {
    if (protocol == null || "HTTP/1.1".equals(protocol)
            || (!apr && org.apache.coyote.http11.Http11NioProtocol.class.getName().equals(protocol))
            || (apr && org.apache.coyote.http11.Http11AprProtocol.class.getName().equals(protocol))) {
        if (apr) {
            return new org.apache.coyote.http11.Http11AprProtocol();
        } else {
            return new org.apache.coyote.http11.Http11NioProtocol();
        }
    } else if ("AJP/1.3".equals(protocol)
            || (!apr && org.apache.coyote.ajp.AjpNioProtocol.class.getName().equals(protocol))
            || (apr && org.apache.coyote.ajp.AjpAprProtocol.class.getName().equals(protocol))) {
        if (apr) {
            return new org.apache.coyote.ajp.AjpAprProtocol();
        } else {
            return new org.apache.coyote.ajp.AjpNioProtocol();
        }
    } else {
        // Instantiate protocol handler
        Class<?> clazz = Class.forName(protocol);
        return (ProtocolHandler) clazz.getConstructor().newInstance();
    }
}
我们看到上述方法实际通过Protocol初始化了ProtocolHandler, 我们看下它所支持的HTTP1.1,Ajp协议的处理,我们通过它的类层次结构来看协议支持处理类
Connector初始化
在JMX的初始化模板方法initInternal中,进行了Connector的初始化,它做了哪些事呢?
- 给protocolHandler初始化了adapter //这adapter是真正衔接Container处理的适配器,后文我们会有详解。
- 设置parseBody的方法,默认为POST方法
- 一些校验
- 调用protocolHandler的init
@Override
protected void initInternal() throws LifecycleException {

    super.initInternal();

    if (protocolHandler == null) {
        throw new LifecycleException(
                sm.getString("coyoteConnector.protocolHandlerInstantiationFailed"));
    }

    // 初始化 adapter
    adapter = new CoyoteAdapter(this);
    protocolHandler.setAdapter(adapter); // 交给protocolHandler
    if (service != null) {
        protocolHandler.setUtilityExecutor(service.getServer().getUtilityExecutor());
    }

    // 设置parseBody的方法,默认为POST
    if (null == parseBodyMethodsSet) {
        setParseBodyMethods(getParseBodyMethods());
    }

    // 校验
    if (protocolHandler.isAprRequired() && !AprStatus.isInstanceCreated()) {
        throw new LifecycleException(sm.getString("coyoteConnector.protocolHandlerNoAprListener",
                getProtocolHandlerClassName()));
    }
    if (protocolHandler.isAprRequired() && !AprStatus.isAprAvailable()) {
        throw new LifecycleException(sm.getString("coyoteConnector.protocolHandlerNoAprLibrary",
                getProtocolHandlerClassName()));
    }
    if (AprStatus.isAprAvailable() && AprStatus.getUseOpenSSL() &&
            protocolHandler instanceof AbstractHttp11JsseProtocol) {
        AbstractHttp11JsseProtocol<?> jsseProtocolHandler =
                (AbstractHttp11JsseProtocol<?>) protocolHandler;
        if (jsseProtocolHandler.isSSLEnabled() &&
                jsseProtocolHandler.getSslImplementationName() == null) {
            // OpenSSL is compatible with the JSSE configuration, so use it if APR is available
            jsseProtocolHandler.setSslImplementationName(OpenSSLImplementation.class.getName());
        }
    }

    try {
        // 调用protocolHandler的init
        protocolHandler.init();
    } catch (Exception e) {
        throw new LifecycleException(
                sm.getString("coyoteConnector.protocolHandlerInitializationFailed"), e);
    }
}
protocolHandler的init做了什么?本质上调用了AbstractEndpoint的init方法
/**
  * Endpoint that provides low-level network I/O - must be matched to the
  * ProtocolHandler implementation (ProtocolHandler using NIO, requires NIO
  * Endpoint etc.).
  */
private final AbstractEndpoint<S,?> endpoint;

@Override
public void init() throws Exception {
    if (getLog().isInfoEnabled()) {
        getLog().info(sm.getString("abstractProtocolHandler.init", getName()));
        logPortOffset();
    }

    if (oname == null) {
        // Component not pre-registered so register it
        oname = createObjectName();
        if (oname != null) {
            Registry.getRegistry(null, null).registerComponent(this, oname, null);
        }
    }

    if (this.domain != null) {
        rgOname = new ObjectName(domain + ":type=GlobalRequestProcessor,name=" + getName());
        Registry.getRegistry(null, null).registerComponent(
                getHandler().getGlobal(), rgOname, null);
    }

    String endpointName = getName();
    endpoint.setName(endpointName.substring(1, endpointName.length()-1));
    endpoint.setDomain(domain);

    endpoint.init();
}
endpoint.init()做了什么呢?之前的版本中是直接调用bind方法,这里改成了bindWithCleanup, 变化点在于失败后的清理操作。
public final void init() throws Exception {
    if (bindOnInit) {
        bindWithCleanup(); // 看这里
        bindState = BindState.BOUND_ON_INIT;
    }

    // 下面就是注册JMX,前文我们有讲
    if (this.domain != null) {
        // Register endpoint (as ThreadPool - historical name)
        oname = new ObjectName(domain + ":type=ThreadPool,name=\"" + getName() + "\"");
        Registry.getRegistry(null, null).registerComponent(this, oname, null);

        ObjectName socketPropertiesOname = new ObjectName(domain +
                ":type=SocketProperties,name=\"" + getName() + "\"");
        socketProperties.setObjectName(socketPropertiesOname);
        Registry.getRegistry(null, null).registerComponent(socketProperties, socketPropertiesOname, null);

        for (SSLHostConfig sslHostConfig : findSslHostConfigs()) {
            registerJmx(sslHostConfig);
        }
    }
}
bindWithCleanup()做了bind方法,如果绑定失败就回调unbind方法。
private void bindWithCleanup() throws Exception {
    try {
        bind();
    } catch (Throwable t) {
        // Ensure open sockets etc. are cleaned up if something goes
        // wrong during bind
        ExceptionUtils.handleThrowable(t);
        unbind();
        throw t;
    }
}
bind()方法做了初始化ServerSocket和初始化ssl
/**
  * Initialize the endpoint.
  */
@Override
public void bind() throws Exception {
    initServerSocket();

    setStopLatch(new CountDownLatch(1));

    // Initialize SSL if needed
    initialiseSsl();

    selectorPool.open(getName());
}

// Separated out to make it easier for folks that extend NioEndpoint to
// implement custom [server]sockets
protected void initServerSocket() throws Exception {
    if (!getUseInheritedChannel()) {
        serverSock = ServerSocketChannel.open(); // 打开ServerSocket通道
        socketProperties.setProperties(serverSock.socket());
        InetSocketAddress addr = new InetSocketAddress(getAddress(), getPortWithOffset());
        serverSock.socket().bind(addr,getAcceptCount()); // 绑定到指定服务地址和端口,这样你才可以通过这个访问服务(处理请求)
    } else {
        // Retrieve the channel provided by the OS
        Channel ic = System.inheritedChannel();
        if (ic instanceof ServerSocketChannel) {
            serverSock = (ServerSocketChannel) ic;
        }
        if (serverSock == null) {
            throw new IllegalArgumentException(sm.getString("endpoint.init.bind.inherited"));
        }
    }
    serverSock.configureBlocking(true); //mimic APR behavior
}
Connector的启动
这里依然是调用JMX的模板方法startInternal方法, start方法本质就是委托给protocolHandler处理,调用它的start方法
/**
  * Begin processing requests via this Connector.
  *
  * @exception LifecycleException if a fatal startup error occurs
  */
@Override
protected void startInternal() throws LifecycleException {

    // Validate settings before starting
    if (getPortWithOffset() < 0) {
        throw new LifecycleException(sm.getString(
                "coyoteConnector.invalidPort", Integer.valueOf(getPortWithOffset())));
    }

    setState(LifecycleState.STARTING);

    try {
        protocolHandler.start();
    } catch (Exception e) {
        throw new LifecycleException(
                sm.getString("coyoteConnector.protocolHandlerStartFailed"), e);
    }
}
protocolHandler.start()方法如下,它又交给endpoint进行start处理
@Override
public void start() throws Exception {
    if (getLog().isInfoEnabled()) {
        getLog().info(sm.getString("abstractProtocolHandler.start", getName()));
        logPortOffset();
    }

    // 本质是调用endpoint的start方法
    endpoint.start();

    // 启动一个异步的线程,处理startAsyncTimeout方法,每隔60秒执行一次
    monitorFuture = getUtilityExecutor().scheduleWithFixedDelay(
            new Runnable() {
                @Override
                public void run() {
                    if (!isPaused()) {
                        startAsyncTimeout();
                    }
                }
            }, 0, 60, TimeUnit.SECONDS);
}
endpoint.start()就是调用startInternal方法。当然它会先检查是否绑定端口,没有绑定便执行bindWithCleanup方法
public final void start() throws Exception {
    if (bindState == BindState.UNBOUND) {
        bindWithCleanup();
        bindState = BindState.BOUND_ON_START;
    }
    startInternal();
}
我们看下NIOEndPoint的startInternal方法做了啥
/**
  * Start the NIO endpoint, creating acceptor, poller threads.
  */
@Override
public void startInternal() throws Exception {

    if (!running) {
        running = true;
        paused = false;

        if (socketProperties.getProcessorCache() != 0) {
            processorCache = new SynchronizedStack<>(SynchronizedStack.DEFAULT_SIZE,
                    socketProperties.getProcessorCache());
        }
        if (socketProperties.getEventCache() != 0) {
            eventCache = new SynchronizedStack<>(SynchronizedStack.DEFAULT_SIZE,
                    socketProperties.getEventCache());
        }
        if (socketProperties.getBufferPool() != 0) {
            nioChannels = new SynchronizedStack<>(SynchronizedStack.DEFAULT_SIZE,
                    socketProperties.getBufferPool());
        }

        // 重点:创建了Executor
        if (getExecutor() == null) {
            createExecutor();
        }

        initializeConnectionLatch();

        // Start poller thread
        poller = new Poller();
        Thread pollerThread = new Thread(poller, getName() + "-ClientPoller");
        pollerThread.setPriority(threadPriority);
        pollerThread.setDaemon(true);
        pollerThread.start();

        startAcceptorThread();
    }
}
createExecutor()方法如下,本质是创建一个ThreadPoolExecutor
public void createExecutor() {
    internalExecutor = true;
    TaskQueue taskqueue = new TaskQueue();
    TaskThreadFactory tf = new TaskThreadFactory(getName() + "-exec-", daemon, getThreadPriority());
    executor = new ThreadPoolExecutor(getMinSpareThreads(), getMaxThreads(), 60, TimeUnit.SECONDS,taskqueue, tf);
    taskqueue.setParent( (ThreadPoolExecutor) executor);
}